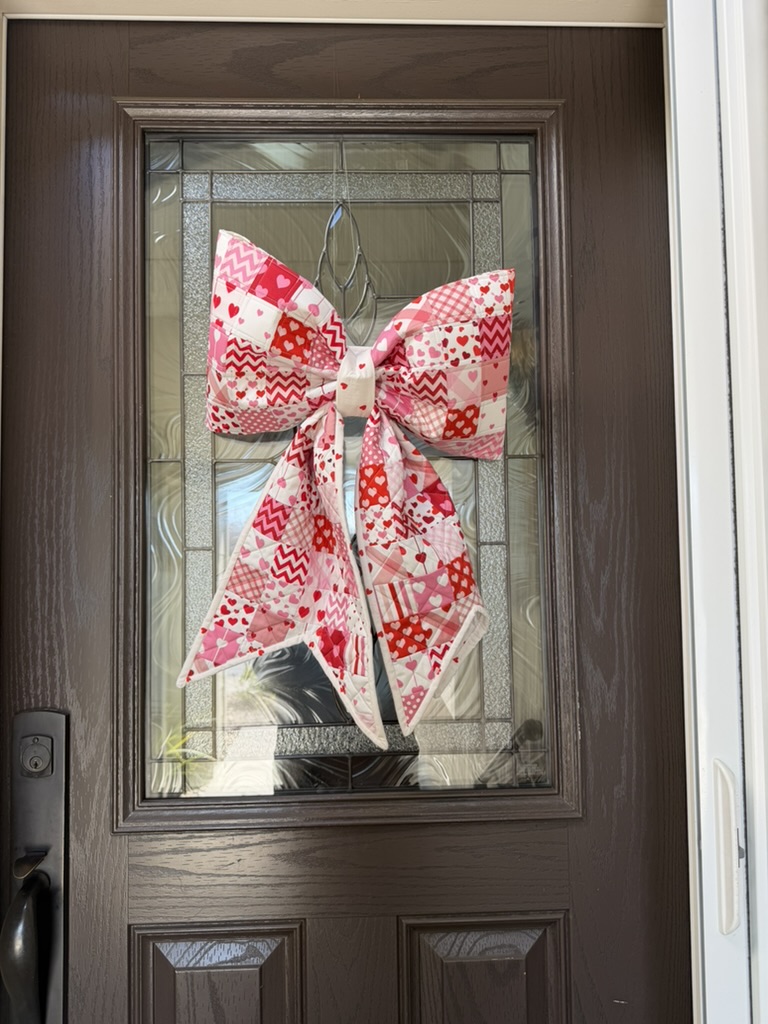
There is something so cheerful about decorating your front door for the season — and this oversized patchwork bow makes such a sweet statement for Valentine’s Day. I love that it combines quilting with home décor, turning simple 2.5” squares into something bold and dimensional.
Today I’m walking you step-by-step through how I made this structured quilted bow, including how I gave the bow loops firmness while keeping the tails soft and flowy.
Materials
- Assorted Valentine-themed fabrics
- 2.5” square ruler or rotary cutting supplies
- 2.5” x 2.5” grid nonwoven iron-on interfacing (I used Breling fusible interfacing)
- Pellon Fuse-N-Shape – medium weight fusible interfacing (for the bow loops)
- Batting (for the tails)
- 505 spray adhesive
- Backing fabric
- Sewing machine + thread
- Iron
Step 1: Cut & Layout
Cut 2.5” squares from your fabrics.
Lay the squares out into:
- 5 rows
- 20 squares per row
You will create two identical panels, so repeat this layout twice. Each panel will finish as 5 rows x 20 columns.
This is a great time to balance color and print — I mixed pinks, reds, hearts, and low-volume prints to keep it playful but cohesive.
Step 2: Fuse Using Grid Interfacing

Working with one panel at a time:
- Lay your 2.5” x 2.5” grid fusible interfacing (nonwoven) wrong side up.
- Position each 2.5” square onto the grid, matching one square per grid section.
- Once aligned, press with a hot iron to fuse the squares in place.
This method keeps everything beautifully aligned and saves so much time compared to sewing square-by-square.
Step 3: Sew the Rows
With the squares fused in place:
- Fold along the grid lines, right sides together.
- Sew down each row.
- Clip seams at intersections (be careful not to cut your stitching).
- Press seams to one side.
After rows are sewn, repeat the process to sew the columns together.
When finished, you’ll have two completed patchwork panels, each measuring 5 rows x 20 columns.
Press thoroughly.
Step 4: Build the Structure
Now we give each section its shape and personality.
For the Bow Loops (Structured Section)
The bow loops need firmness so they hold their shape on the door.
- Fuse Pellon Fuse-N-Shape (medium weight) to the back of the patchwork.
- I used 505 spray adhesive between the interfacing and patchwork to ensure a smooth bond.
- Press well.
This creates a sculptable, structured fabric that holds its bow shape beautifully.
For the Tails (Softer Section)
The tails should have movement and drape.
- Create a quilt sandwich:
- Batting
- Patchwork
- 505 spray adhesive between layers
This gives the tails a softer, more dimensional look.
Step 5: Quilt
Now comes the fun part — quilting!
You can choose your style:
- ✨ Loose and flowy for a romantic look
- 📏 Grid quilting (what I chose) for a modern feel
Quilt both the bow loops and the tails before moving on.
Step 6: Add the Backing & Turn
For each section (bow loops and tails):
- Cut backing fabric to match your shaped pieces.
- Place backing right sides together with your quilted patchwork.
- Sew around the edges – be sure to leave about a 6″ opening on the side.
Turn right side out.
Press carefully and hand stitch the opening closed.
Step 7: Form & Assemble the Bow
Now it’s time to bring everything together!
Shape the Bow Loops
- Take your structured bow panel (the one with Pellon Fuse-N-Shape).
- Find the center of the panel and mark it lightly.
- Bring both short ends of the panel inward toward the center leaving a 2 inch gap, sewing them in place about an inch on each side of the center mark.
This creates the two bow loops. Because of the Fuse-N-Shape, the loops will hold their form beautifully.
Gently shape and fluff the loops until they look balanced and full.
Attach the Tails
- Position the quilted tails underneath the bow loops, arranging them so they hang evenly.
- Using leftover backing fabric, cut a 3 inch by 12 inch strip.
- Wrap this strip tightly around the center of the bow (covering the stitched area).
- Tie it securely at the back, catching both the bow loops and the tails together.
Why I Love This Project
This bow blends quilting and décor in such a satisfying way. The grid interfacing keeps piecing precise, and combining different stabilizers creates contrast between structure and softness.
It’s scrap-friendly, beginner-friendly (thanks to the grid method), and makes a bold seasonal statement.
And honestly? There’s nothing sweeter than seeing patchwork on your front door.
If you make one, I’d love to see your version — tag me so I can celebrate your creation! 💕
Links to the products I used to make this valentines version:
Follow along on instagram: @lapinsta or @poppyroadquilting
Happy Creating! I can’t wait to see what you make – there are so many holiday’s you can create for or seasons.
xoxo,
Leah

Leave a comment